Admin Portal 

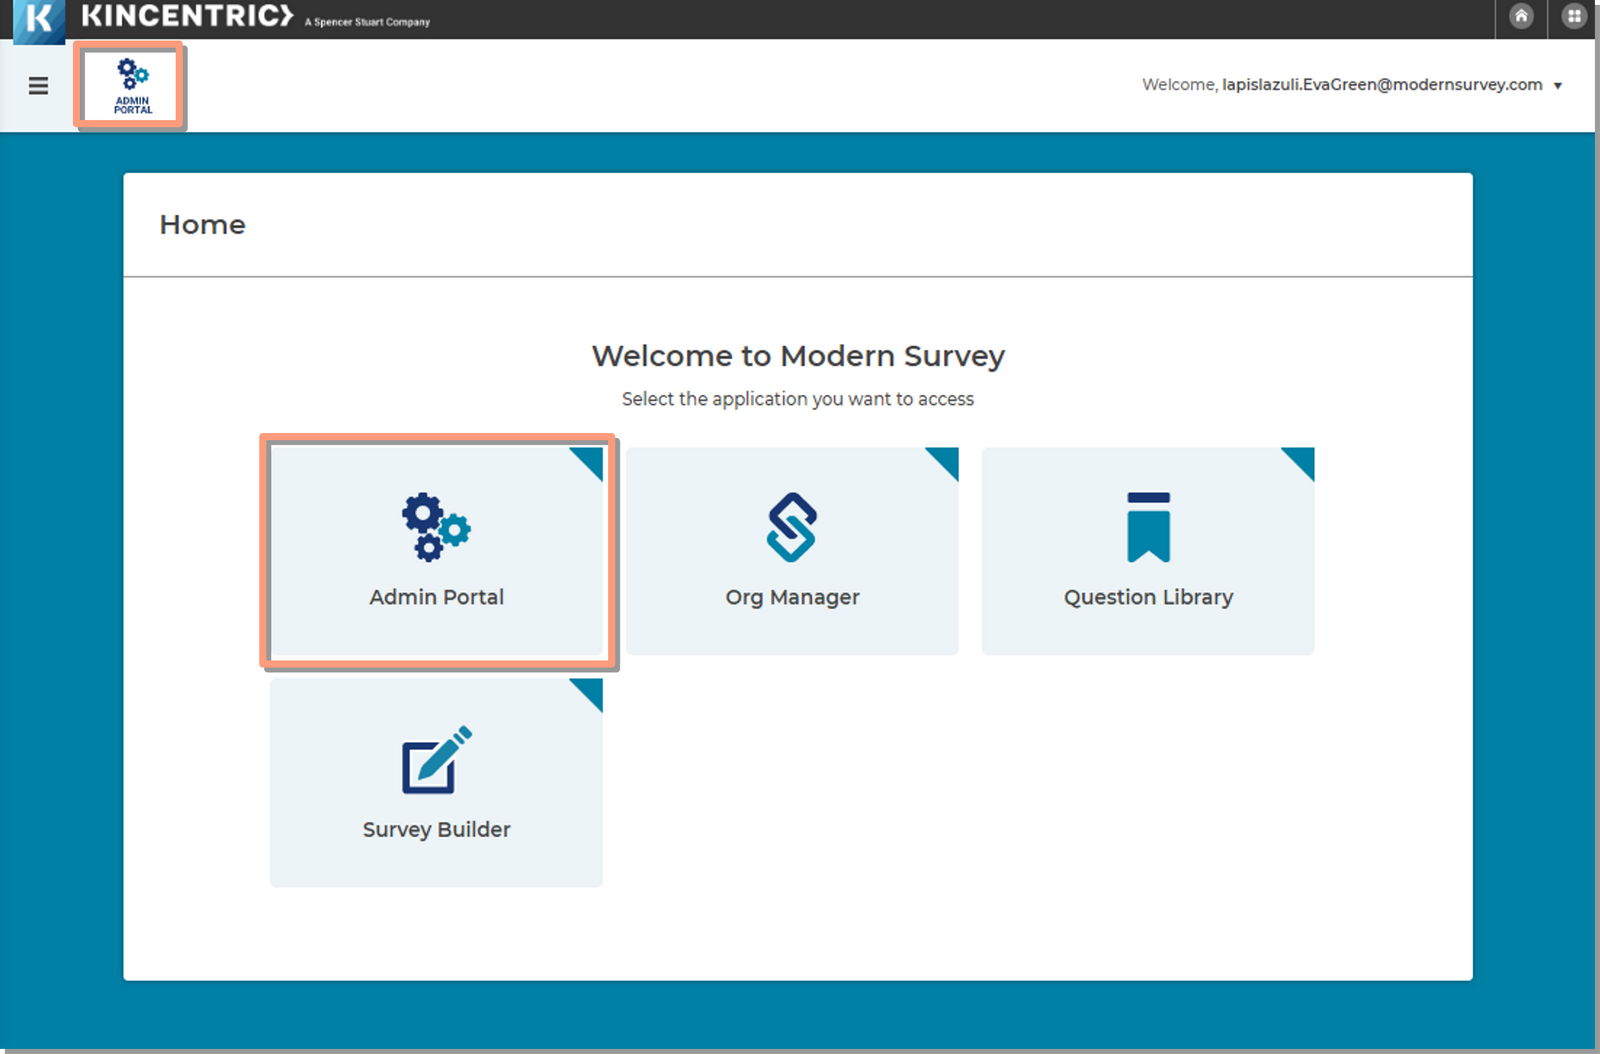
The Admin Portal is used to manage access to the Org Manager, Question Library & Survey Builder. You should have at least one person in your company who has access to the Admin Portal that manages access for all the people within your company.  If you do not know who your Admin Portal Account Admin is, reach out to your Kincentric partner.

Admin Portal Instructions

How to add a user to Survey Builder, Question Library and Org Manager
  1. At the top right side of the screen, click the Tile Icon and select the Admin Portal from the popup menu.
  2. In the row with your company name, click the ... Icon under the Actions  column
  3. Select:  Users
  4. Click: Add Users 
  5. Basic Info
    1. First Name: Enter the First Name
    2. Last Name: Enter the Last Name
    3. Email Address: Enter the Email Address
      1. The email address must be a valid email address.
      2. The email address must not already be found in our system or an error will occur.
        • If an email already exists for this user, exit out of the page by hitting Cancel at the bottom of the page. Return to the Users page and select Edit in the Actions column for the user with the duplicate email address.
        • Users can only be entered in to the system once.
        • If this is the same user, validate the existing information is correct.
        • If this is a different user than you’re adding but the email address is the same you will need to investigate which address to use and either update the existing user or create a new user with a different address.
      3. An email will be sent to the user immediately notifying them they have access and requesting they set their password within 7 days.
  6. Clients: Enter the details for the Clients section
    1. User Roles: Click the Drop Down menu and select the Desired Roles.
      1. Account Admin (Admin Portal): Provides access to the Admin Portal, this will allow the user to create additional users.
      2. Survey Builder: Provides access to the Survey Builder application.
      3. Org Manager: Provides access to the Org Manager application. This role will only be available if you purchased the Enterprise package.
      4. Question Library (Edit): Provides access to the Question Library so a user can create client specific questions and dimensions that all Survey Builder users can see. This user is usually the Account Admin (Admin Poral) and shouldn't be given to all users.
    2. Click: Apply
  7. Click: Save
Resend a 'new user' invitation email

When you create a new user, the system will send the user an email notifying them of the access and requesting the user set their password. They have 7 days to set their password before the link expires. You can resend them a new invitation if the link expires.

  1. Navigate to the Admin Portal Home Page: Click the ... Actions icon
  2. Select: Users
  3. Click the ... Actions icon for the desired user
  4. Select: Resend Invite
Edit a users information

At any time, you can update a user’s First Name, Last Name, Email Address, applications they have access to and user status.

  1. Navigate to the Admin Portal Home Page: Click the ... Actions icon
  2. Select: Users
  3. Click the ... Actions icon for the desired user
  4. Select: Edit
  5. Make the Desired Edits
  6. Click: Save
Temporarily Remove user access

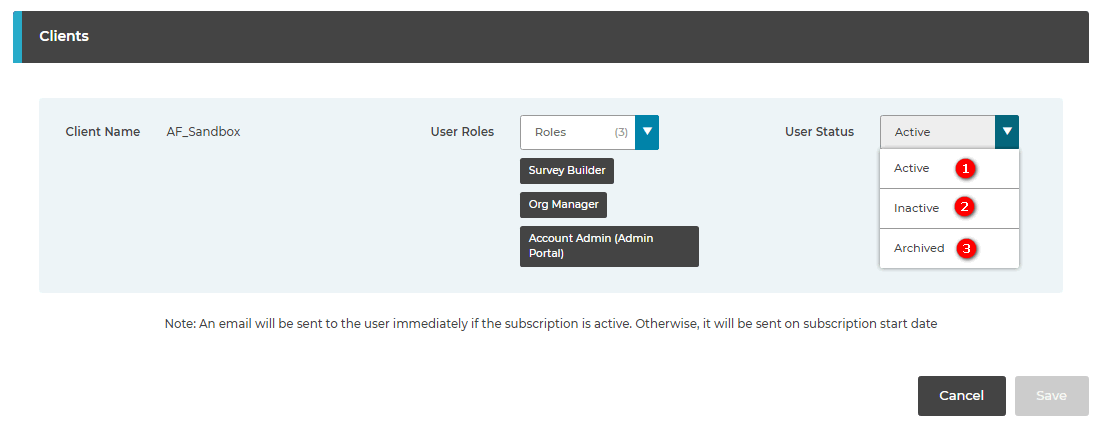
When a user goes on leave but plans on returning, you can temporarily revoke access using the following steps:

  1. Navigate to the Admin Portal Home Page: Click the … Actions icon
  2. Select: Users
  3. Click the … Actions icon for the desired user
  4. Select: Edit
  5. In the User Status drop down menu, select: Inactive
    • Active: The user has access to the system.
    • Inactive: The user has set their initial password, but not logged into the system yet.
    • Archived: Access to the system is revoked and the user should not be able to log in.
    • Initial: The user has not set their initial login password yet.
  1. Click: Save
    1. Note - You can leave the User Roles as they are so when the person returns they will continue to have the same access as before.


Delete user and transfer Files

When a user leaves your company and there is no possibility that they will be returning, you should delete them and transfer all of their files to someone else in your company who will continue with their work. 

  • Deleting the user will remove all references of them from the system. The user cannot be 'un-deleted' later, it will be as if they never existed in the system.
  • You must choose a person to move the files to
  • You can only choose 1 person
  • You cannot choose which files to move, all files will be moved
  • By 'files' we are referring to
    • All surveys created by the user
    • All org manger employee files 
    • All hierarchies created by the user
    • All survey reporting site profiles the user has access to for closed surveys


  1. Navigate to the Admin Portal Home Page: Click the … Actions icon
  2. Select: Users
  3. Click the … Actions icon for the desired user
  4. Select: Delete User
  5. Select the person who you want to receive the new files for
  6. Click Transfer
Transfer Ownership (transfer all files to someone else)

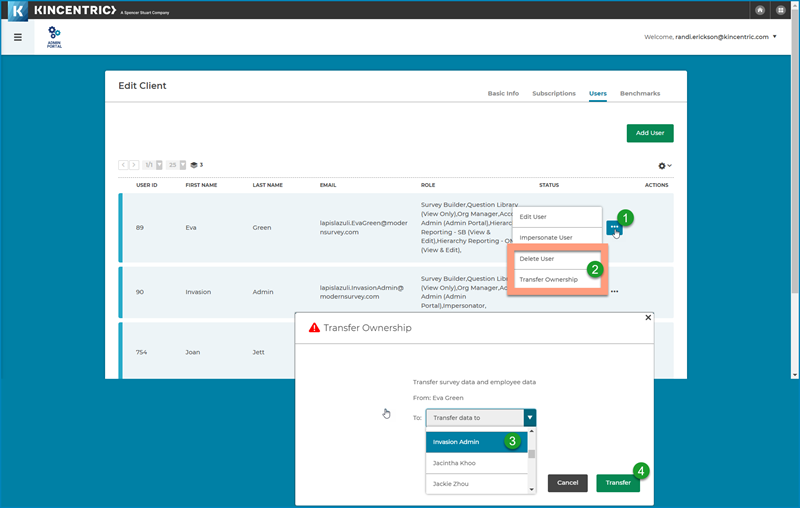
When a project changes hands or someone goes on leave, use the 'Transfer Ownership feature to move all the files from one account to another account.

  • You must choose a person to move the files to
  • You can only choose 1 person
  • You cannot choose which files to move, all files will be moved
  • By 'files' we are referring to
    • All surveys created by the user
    • All org manger employee files 
    • All hierarchies created by the user
    • All survey reporting site profiles the user has access to for closed surveys
  1. Navigate to the Admin Portal Home Page: Click the … Actions icon
  2. Select: Users
  3. Click the … Actions icon for the desired user
  4. Select: Transfer Ownership
  5. Select the new owner from the dropdown
  6. Click: Transfer