360⁰ Self Service

Kincentric will create a template for you including notifications, these instructions provide the details on how to create an event using the recommended settings. If you have questions about the settings, please reach out to your Kincentric partner.

Create 360⁰ Events

Follow the steps below in the ordered listed on the page to create and manage a 360⁰  event using the template created by your Kincentric partner.

Create an Event

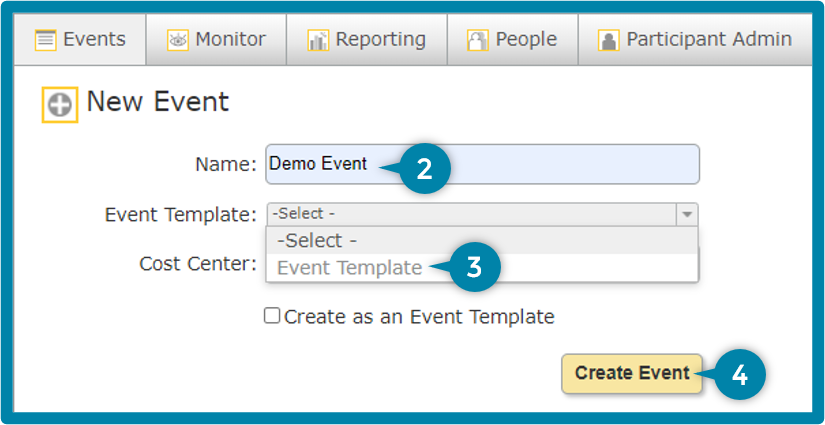
Step 1 in the process is to create an event using a template that Kincentric provides you. For all the activities on this page, you will client the Client Admin tab.

  1. Click New Event button
  2. Enter the name  of your event in  Name field
  3. Use the dropdown  menu to select the event template . The options in the dropdown were created for your company by Kincentric.
  4. Click on Create Event

Set Event Dates

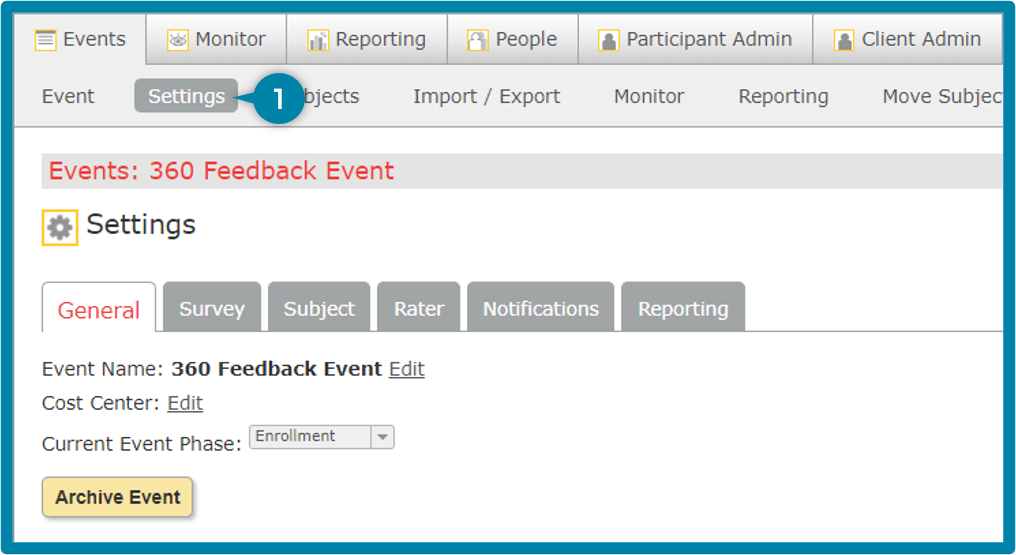
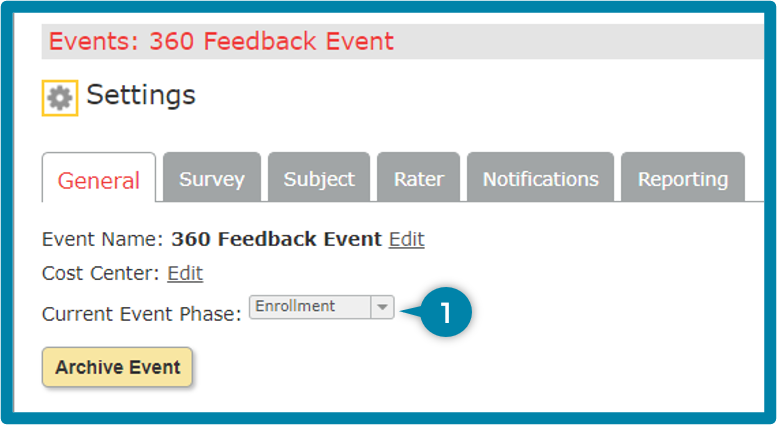
Step 2 in the process is to define the dates for each phase of the event. There are generally 3 phases: 

  • Enrollment: Event participants will nominate their raters and go through the nomination approval process. Typically, this activity should last about 1 week.
  • Surveying: Raters complete the surveys. This activity should last about 2 weeks to give raters plenty of time to respond.
  • Reporting: Report Administrators are generating reports and Report Reviewers are reviewing the results and releasing them to the participants.
  1. Click on the  Event Name
  2. Click  Enrollment  in the  Event Timeline
  3. Dates Section
    1. Start Date: Click on the Calendar Icon and select the date and time this phase should begin.
      • The date and time must be in the future. The system will not look backward.
    2.  End Date: Click the Calendar Icon and select the date this phase should end.
      • The ‘Display End Date’ of a phase is only for DISPLAY in the participant portal, this date does NOT influence ending a phase. The START date of any phase is what actually ends the previous phase. This is helpful to allow lag time between phases if needed.
      • You only need to set the start date of the last phase to be set in your event.
  4. Scheduled & Triggered Notifications Section
    • Leave this empty for now, you'll complete this later in the process.
  5. Rater Settings Section
    • Check Allow Surveying if you think there will be a possibility for some people to start surveying before this phase ends.
  6. Access to Generate Report Settings Section
    • Both of the options for generating reports should be set to Can't Generate as no survey results would be available to generate at this point in the process.
  7. Click on the Surveying tab
  8. Dates Section
    1. Start Date: If you entered an End Date in the Enrollment tab, this would be filled out for you.  You can enter a different date if desired.
    2. End Date: Click the calendar icon and select the date this phase should end.
  9. Scheduled & Triggered Notifications Section
    • Leave this empty for now, you'll complete this later in the process.
  10. Subject Settings Section - the standard settings for this section should be;
    1. Subject Rater Access: Read and Edit - this allows the participant to select their own raters. f you will be assigning raters, select: None.
    2. Subject Monitor Acces: Roles (the user can see how many raters have completed the survey, not who has completed it)
      • The other option is Raters, this should not be used due to displaying confidential information about who has completed the survey
  11. Rater Settings
    1. Check: Allow Surveying
  12. Access to Generate Report Settings Section
    1. Select Can Generate if you want either the participant or the Report Admin to be able to generate reports before moving into the reporting phase.
  13. Click on the Reporting tab
  14. Dates Section
    1. Select the Start Date for this phase
    2. Select the End Date for this phase
  15. Scheduled & Triggered Notifications
    • Leave this empty for now, you'll complete this later in the process.
  16. Subject Settings Section - the standard settings for this section should be;
    1. Subject Rater Access: None
    2. Subject Monitor Acess: None
  17. Rater Settings Section
    1. Check Allow Surveying if you think some raters still might need to take survey's while in the reporting phase
  18. Access to Generate Report Settings
    1. Subject Report Generation Access: Set to Can Generate if you are going to allow participates to generate their own reports. Usually this is not allowed and should be set to Can't Generate.
    2. Report Admin (Manager/HRBP) Report Generation Access: Set to Can't Generate - this will prevent the Manager/HRBP of the participant from being able to generate reports. This is usually done by the client admin.
Event Settings

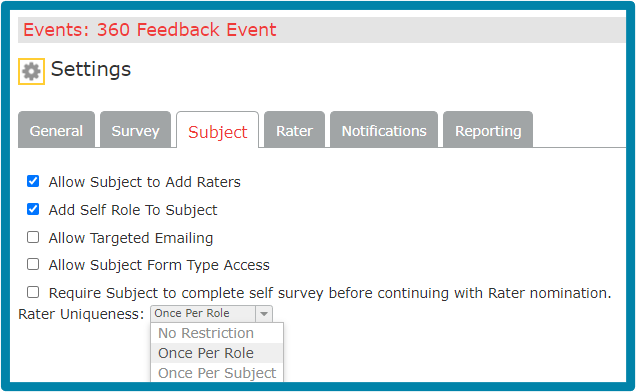
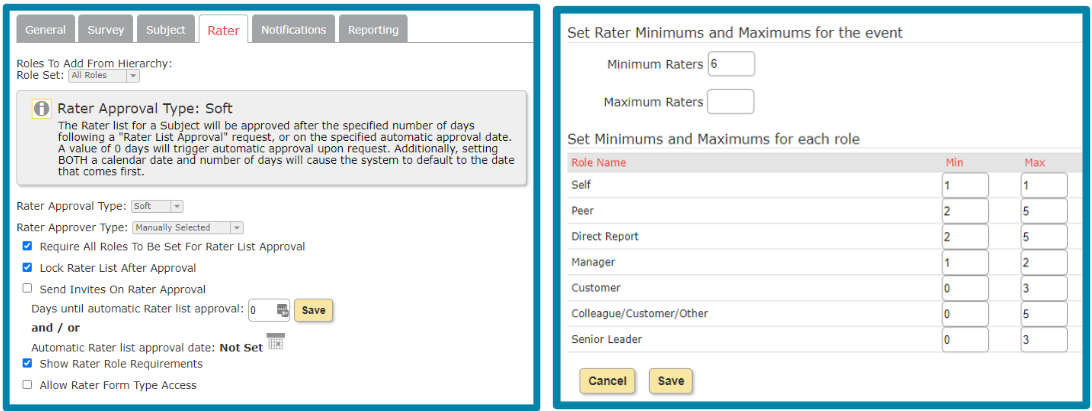
In Step 3, you'll define the settings for the events.

  1. Navigate to Events/Settings in the top navigation menu


General Tab

  1. Select the Enrollment phase from the drop down menu


Survey Tab

  1. Survey Content: Select the survey content from the dropdown, Kincentric creates survey's for your events. There may be several to choose from.
  2. Survey Progress will display a percent complete within the survey so as the rater moves through the survey they know how far along they are. The most common settings are;
    1. Check: Show Survey Progress
    2. Check: Show Page Percent Complete


Subject Tab

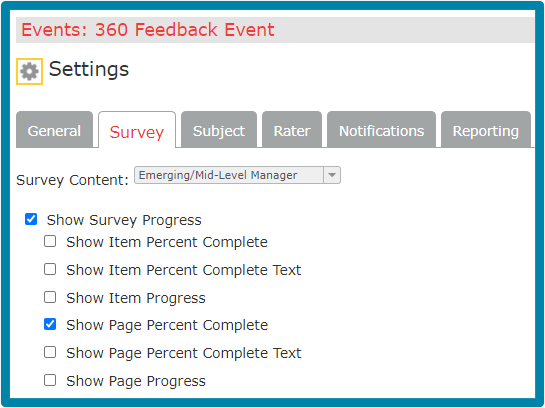
Select the options below, the options not present are usually only used by Kincentric.

  1. Check: Allow Subject to Add Raters (this will allow the participants to nominate their raters)
  2. Check: Add Self Role to Subject (this will allow the participant to add themselves as a rater)
  3. Optional: Require Subject to complete self survey before continuing with Rater nomination
  4. Rater Uniqueness: Once Per Role (this will ensure that a rater isn't added multiple times in different roles for one participant)


Rater Tab

  1. Role Set: If there are standard roles for you company, Kincentric would have created a Role Set for you to choose from. Use the dropdown to select a role set.
  2. Rater Approval Type: Select Hard or Soft (we recommend Hard)
    • Hard: The Rater list must be approved manually upon request. There is no auto-approval.
    • Soft: The Rater list will be automatically approved after the specified number of days or on the specified date.
  3. Rater Approver Type: Select the desired type based on the following;
    1. Manually Selected: A person must be assigned as “Rater Approver” using the upload template or by setting the Approver from the Subject page. This is done by an administrator and cannot be selected by the Subject
      • This may be used if there is a known Approver for a Subject or event, or if the Approver will not be participating in the survey
    2. Self-Approval: The Subject or “Self” must approve his/her own rater list.
      • This may be used when there is specific rater criteria required before taking the assessment.
    3. By Role: An approver can be delegated based on their role.
      • This is designed for use with a role that has only one person assigned (example: Manager or Team Leader). If there is more than one person assigned to this role, the system will automatically assign the first person who is added to the rater list with the Approver role. An administrator can change this using step 1 from above.
  4. Check: Require All Roles To Be Set For Rater List Approval
  5. Check: Lock Rater List After Approval. When checked, once a rater list is approved no additional changes can be made.
  6. In cases where you want to move along the process when rater approvals are pending, you have several options for overriding the approvals;
    1. Send invites on Rater Approval: When checked, the active invitation template will automatically be sent to all raters once the Approver approves the Subject’s rater list.
    2. Days until automatic Rater list approval: Set the number of days from the request being sent where the list is automatically approved so surveying can begin for everyone.
    3. Automatic Rater list approval date: Set a date for all rater lists to automatically be approved so surveying can begin for everyone.
  7. Check: Show Rater Role Requirements: When checked, Subjects will see a box in the bottom right corner of their screen with the criteria for rater selection. The boxes will show green check marks as they add raters to meet the listed criteria.   
  8. Allow Rater Form Type Access: This should not be used unless survey content is set up for this function. Please contact your Kincentric Project Manager.
  9. Set Rater Minimums and Maximums for the Event Section
    1. In this section, you'll define how many raters there should be for the event and for each role.
    2. Enter the minimum number and maximum number. If there is no maximum, leave the textbox empty.


Notifications Tab

The default settings already have checkboxes next to the standard notifications. We suggest not modifying this section.

Notifications available on this tab were created by your Kincentric project team. You can edit them if desired by simply clicking Edit for the desired notification.

Throughout the emails, you'll find areas where we use 'replacement keys' which is text that is between brackets. When you see this text, we will automatically fill in specific people details so the emails feel personal.  Below is a list of replacement keys you can use:

  • {Event_Name}
  • {Link_NewUserSetup}
  • {Link_ResetUserPassword}
  • {Link_ToParticipantAdminAutoLogin}
  • {Link_ToParticipantAdmin}
  • {Link_ToSurvey}
  • {Subject_Name}
  • {Subject_FirstName}
  • {Subject_LastName}
  • {Subject_EmailAddress}
  • {Rater_Name}
  • {Rater_FirstName}
  • {Rater_LastName}
  • {Rater_EmailAddress}
  • {ReportAdmin_Name}
  • {ReportAdmin_FirstName}
  • {ReportAdmin_LastName}
  • {ReportAdmin_EmailAddress}
  • {Approver_Name}
  • {Approver_FirstName}
  • {Approver_LastName}
  • {Approver_EmailAddress}


Reporting Tab

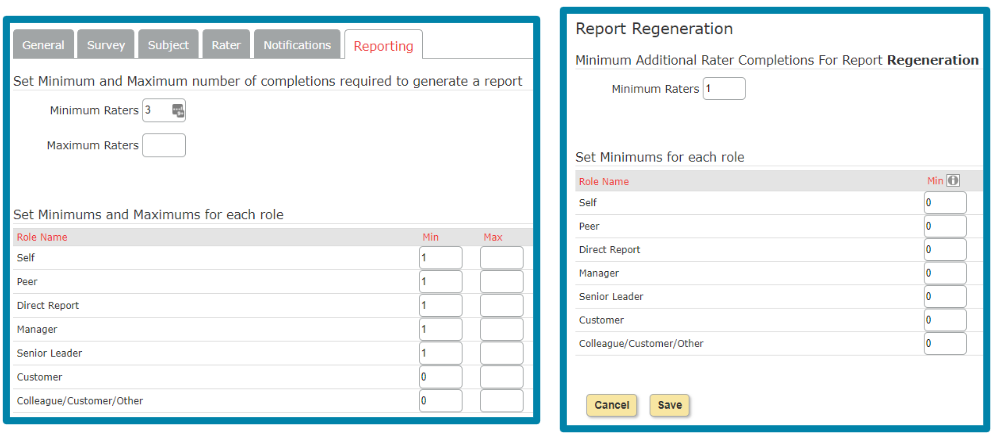
This is where you'll define how may survey's should be taken before a report can be generated. The minimum you should set is 3 to preserve confidentiality of raters and provide enough results to be useful.

  1. Set the Minimum and Maximum number at the Event level. If desired, you can add them at the role level.
  2. Report Regeneration allows you to define how many survey must be taken before re-generating a report. When the minimum number is met, the generation button will turn green letting you know the requirement has been met. Typically there should be at least 1 new completion.


Add Event Participants

Step 3 in the process is where you will add the people who will participate in the event, these are refered to as Subjects or Participants.

  1. Click on Import/Export to upload subjects or Add Subjects to add individual subjects manually.
  2. Select from one of the provided templates to create an upload file
    1. Subject Template: will allow to upload only subjects
    2. Rater Template: will allow to upload subjects as well as their respective raters.
  3. Your file should include: email address, first name, and last name of subject and/or raters.
    • If applicable, you may include a rater list approver’s email address.
    • Example: Cell E2 designates afarwell@modernsurvey.com as the Rater List Approver for kamundson@modernsurvey.com, and vice versa for the following line.
  4. Upload
    1. Click Choose File
    2. Click Browse to look for your file
    3. Click Upload File
    4. Click Next
  5. Resolve. A green box will confirm the file has been uploaded. This step will show any possible matches in the system. If there is no one to resolve, click Next
    • Example: A person may have been uploaded with a misspelled email address
  6. Exclude. This page will show anyone who has recently gone through a 360. This can help you exclude people who may have gone through the process too recently. 
    1. If you want to exclude a person, check the box next to their name. 
    2. If you want to see what events they were a part of click on the + symbol under the ‘Events’ header to expand the section. 
    3. Once all subjects have been reviewed/excluded click Next
  7. Confirm. This page will show the final list of 360 subjects
    1. If all data showing is correct, click ‘Submit
    2. A green box will confirm the upload was successful
  8. Click on the Subjects tab to view the results of the upload.
Start the Event | Send Notifications

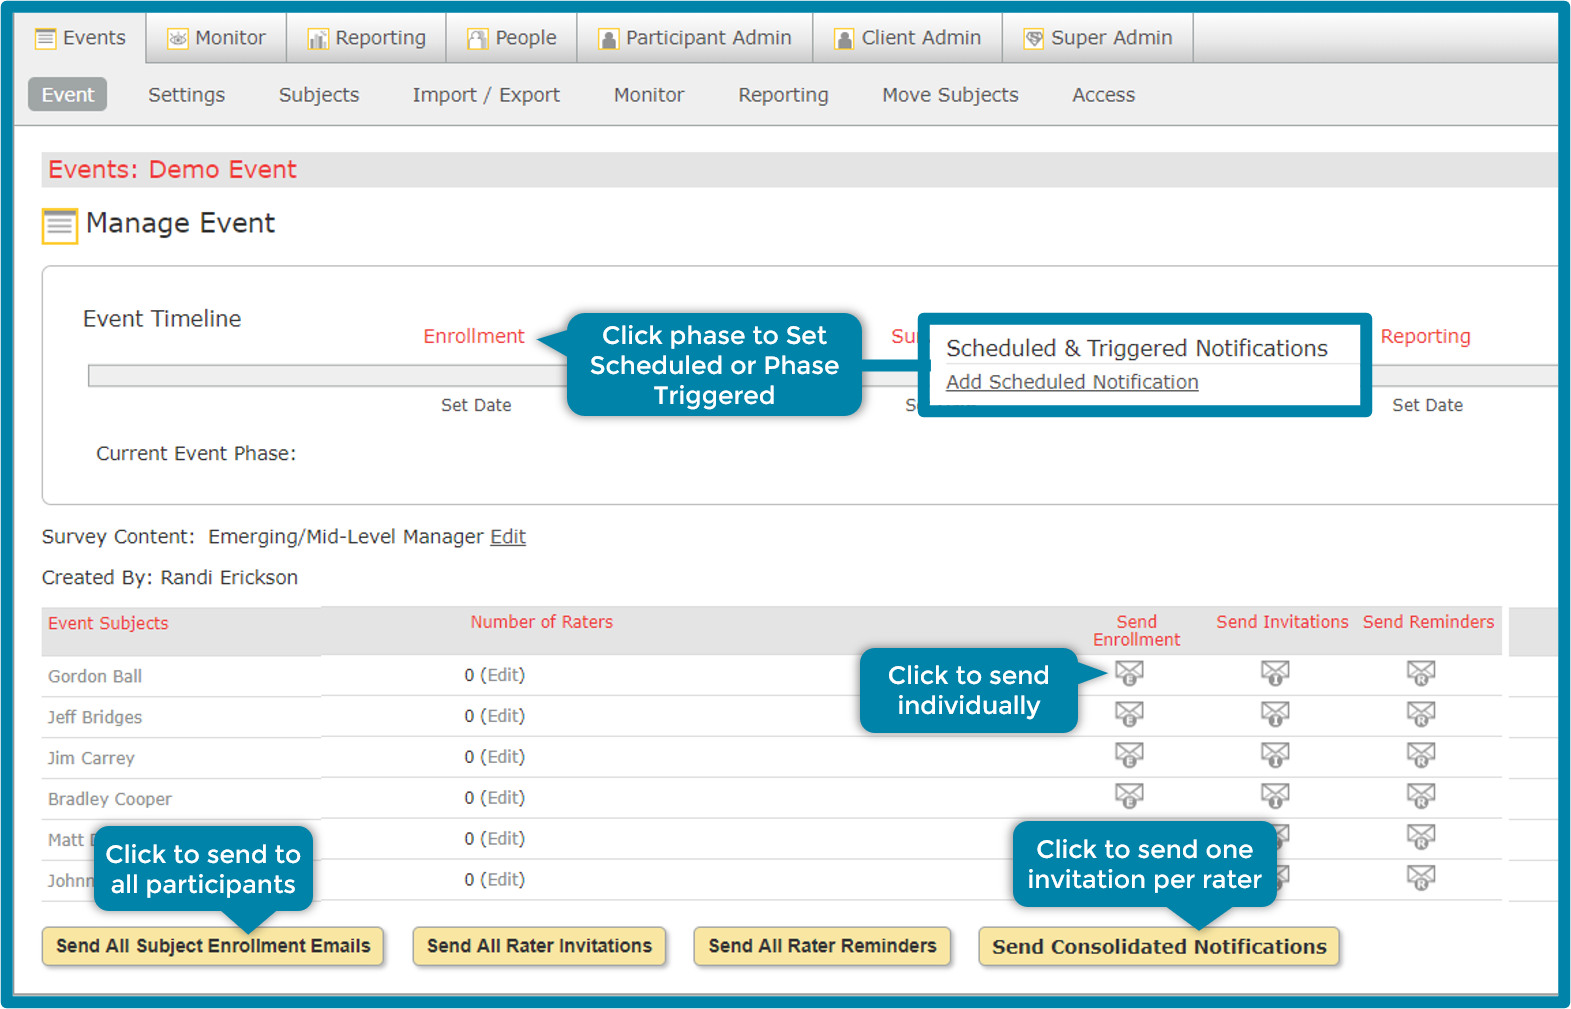
In Step 4 of the process, all of your configuration should be completed and you can get the event started by sending then notifications.  You have 3 options for sending emails'

  1. Manually: Click a button to send all emails immediately.
  2. Scheduled or Phase Triggered: Invitations will automatically be send on the date and time that you have set as the ‘Start Date’. Or you can choose ‘Scheduled’ where you can use the calendar icon to set the date and time at which the invites will send automatically.
  3. Consolidated: Our system will only send (1) email to a rater no matter how many times they are nominated. This is ideal if you have an event/events where people are nominated several times. This does NOT work if you send unique links to each rater for each survey.

Navigate to Events/Event in the navigation menu.

1. Manually

  1. Click the Send All Subject Enrollment Emails button or applicable notification button OR Click on the respective Envelope Icon next to the Subject’s name 


2. Scheduled or Phase Triggered

  1. You can choose either ‘Phase Triggered’ to send invites automatically on the date and time that you have set as the ‘Start Date’. OR you can choose ‘Scheduled’ where you can use the calendar icon to set the date and time at which the invites will send automatically.
  2. Click on the Phase Name to schedule emails within that phase.
  3. Click on Add Scheduled Notification
  4. Click on Select next to the notification you want to send
  5. Click Save
  6. Choose ‘Scheduled’ or ‘Phase Triggered’ from the drop down menu and select Save’
    • If choosing to schedule, select a date and time using the calendar icon.


3. Consolidated - Use this process if you are adding raters for the participants

  1. Click on Send Consolidated Notifications
  2. Click on the Dropdown menu to select the notification template you would like to send.
  3. Click Next
  4. Click on the Radio Button next to your notification.
  5. The list of people that the notification will be sent to will load below.
    1. Under the ‘Count’ column will show the number of times a person has been rated.
    2. Click Send Notifications
  6. Follow same steps for other notification templates (ie: reminder, etc).

Monitor Participation

At anytime, you can view and export the participation. The monitor can be helpful in determining if an event phase should be extended due to low participation or help identify when you should send rater reminders to encourage participation. Below is an overview of the monitor and how to export the results.

  1. Within the event you wish to view, click on Monitor
  2. Click on Export to get the Excel export of this page
  3. Click on View under the Details header to view the participation rates of a specific subject
Reports

When the surveying period of the event is over, reports will need to be generated for the participants. You will need to apply the report template, generate the data, populate and release the reports. In cases where the policy is to have a leader or coach review and release the report, you will need to assign Event Report Rights.


Report Templates

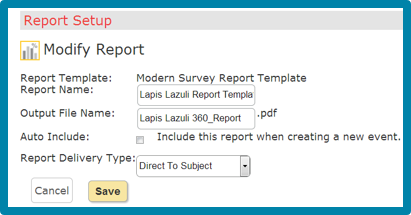
Select a report template. Selecting a report template will allow you to determine the delivery process. You can choose to have the report released directly to the participant or go through the approver and release process.

How to select a report template:

  1. Click Reporting from the navigation menu
  2. Click the Event
  3. Click Report Templates from the navigation menu
  4. Click Add next to the template
  5. Click Edit next to the Event Report Template you selected
  6. Change the Name of the Report and Output File Name if desired. Output file name will assign a name to the report when the user downloads it.
  7. Auto Include: If you only have one template for all your events, check this selection.
  8. Select the Report Deliver Type:
    1. Direct to subject allows the report to be delivered to the participant as soon as it’s ready.
    2. Admin Release requires the Report Admin to release the report before it can be sent.


  9. Click Save


Assign Report Admins

Report Admins are the individuals who will be approving and releasing reports to the participants if the Event Admins will not be completing this activity.

How to assign report admins:

  1. Click Report Setup from the navigation menu
  2. Click Report Admins
  3. Search for the user
  4. Click Add Report Admin under Client Relation


Assign Report Participants

This step will assign the participants to the correct Report Admin. The Reporting Admin will only see participants assigned to them.

How to assign participants:

  1. Click Report Setup from the navigation menu
  2. Click Report Admins
  3. Click All Report Admins Tab if not already selected
  4. Click Edit Subjects next to the Report Admins name
  5. Select Add next to the participants you want the Report Admin to be responsible for
  6. Click Ok
  7. Click Event Report Admins Tab
  8. Review the list of Report Admins and Participants. Click Edit Subjects to make any changes necessary


Create and Choose Role Group Set

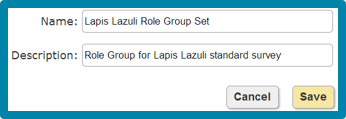
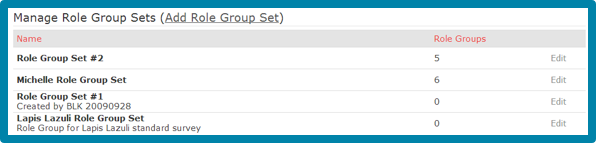
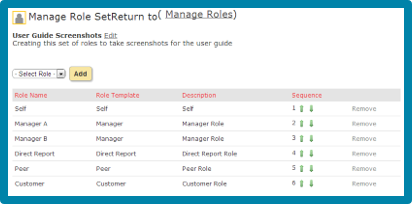
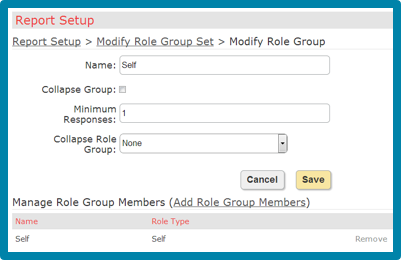
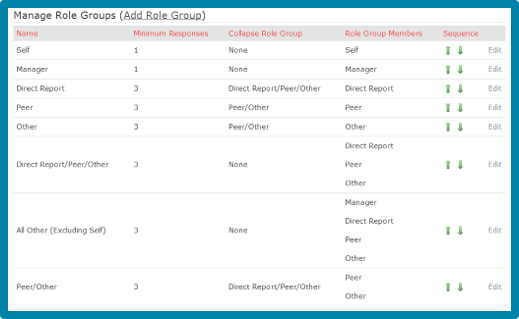
Creating a role group set for reports allows you to group the raters results if responses fall below a defined number of responses (generally 3). Assigning a group in the report will give the participant a better understanding of the overall results.

 How to create and choose the role group set:

  1. Click Report Setup from the top navigation menu
  2. Click Add Role Group Set
  3. Enter a Name and Description 
  4. Click Save

  5. Click Report Setup from the navigation menu. You will now see your Role group set under Manage Role Group Sets

  6. Next step is to create groups and assign the minimum number of responses required to group them together in the report. Click Edit in the far right of the screen for the Role Set you created
  7. It is standard process to create a Reports Role Group based on the Role Set you created in the template or event, below is an example of the Event Roles, we'll create a Report Role Group using this example.

  8. Click (Add Role Group)
  9. Name: Enter a Role Name that is in the Event Roles, in this example we create one for Self 
    1. Collapse Group: Uncheck
    2. Minimum Responses: 1
    3. Collapse Role Group: None
    4. Click Save
    5. Click (Add Role Group Members) 
    6. Select Add next to Self
    7. Click OK
    8. Click Save
    9. Click Modify Role Group Set in the menu

      • You will see your new group Member Self now reflected as a Role Group Member 

  10. Create a Role Group for Managers A and B: 
    1. Click (Add Role Group) 
    2. Name: Managers 
    3. Collapse Group: Check (were going to combine Manager A and B)
    4. Minimum Responses: 3
    5. Collapse Role Group: None
    6. Click Save
    7. Click (Add Role Group Members) 
    8. Select Add next to Manager A
    9. Select Add next to Manager B
    10. Click OK
    11. Click Save
    12. Click Modify Role Group Set in the menu
  11. Repeat steps 8 and 9 to create a Report Role Group for each Role in the Event using the standard defaults below:


Documents

Client Documents is a useful tool if you want to store documents related to 360 such as people files, company procedures, user guides, etc. When you upload a file, a library icon will appear on the right side of the screen that can be accessed anywhere from the Paricipant & Client Admin site.
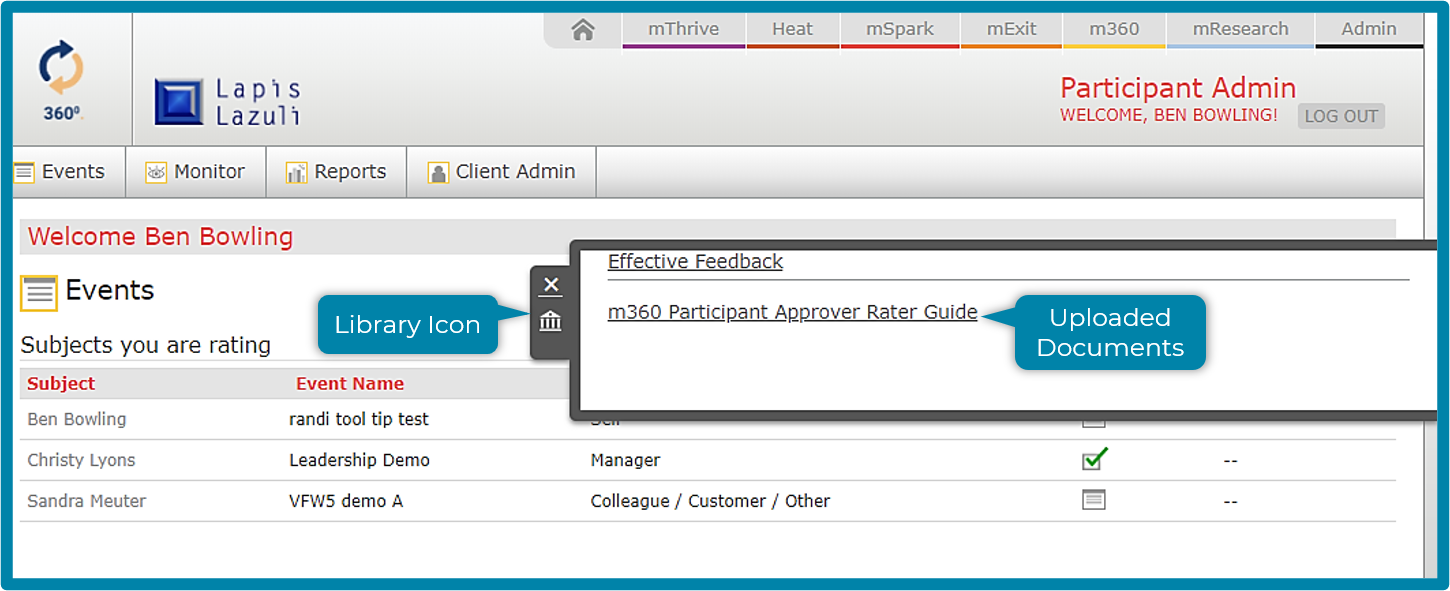

Upload Documents

  1. Click Documents from the navigation menu
  2. Click Client Documents
  3. Name: Type the Name of the document
  4. Select File: Click Choose File and navigate and select the document on your computer
  5. Location: Default is Dashboard, generally this is the only option available
  6. Click Add. The document is now listed in the table. You can Remove it or Edit the name if the document at any time however you cannot make changes to the document as it is read only once uploaded.
Event Admin Access

Event Admin Access is helpful if you only want to provide a user administrative access to one event and not all the functions in the 360 application. This access will allow them to edit event items, subjects, raters, send reminders etc. but not allow them access to application specific menu items such as managing people, client admin, etc.

  1. Click Events from the navigation menu
  2. Select an existing event that you want to give the user admin access to
  3. Click Event Admin Access from the navigation menu
  4. Search for the User
  5. Click Add Event Admin. The user is now listed as an event admin and can be removed at any time by returning to Event Admin Access.